
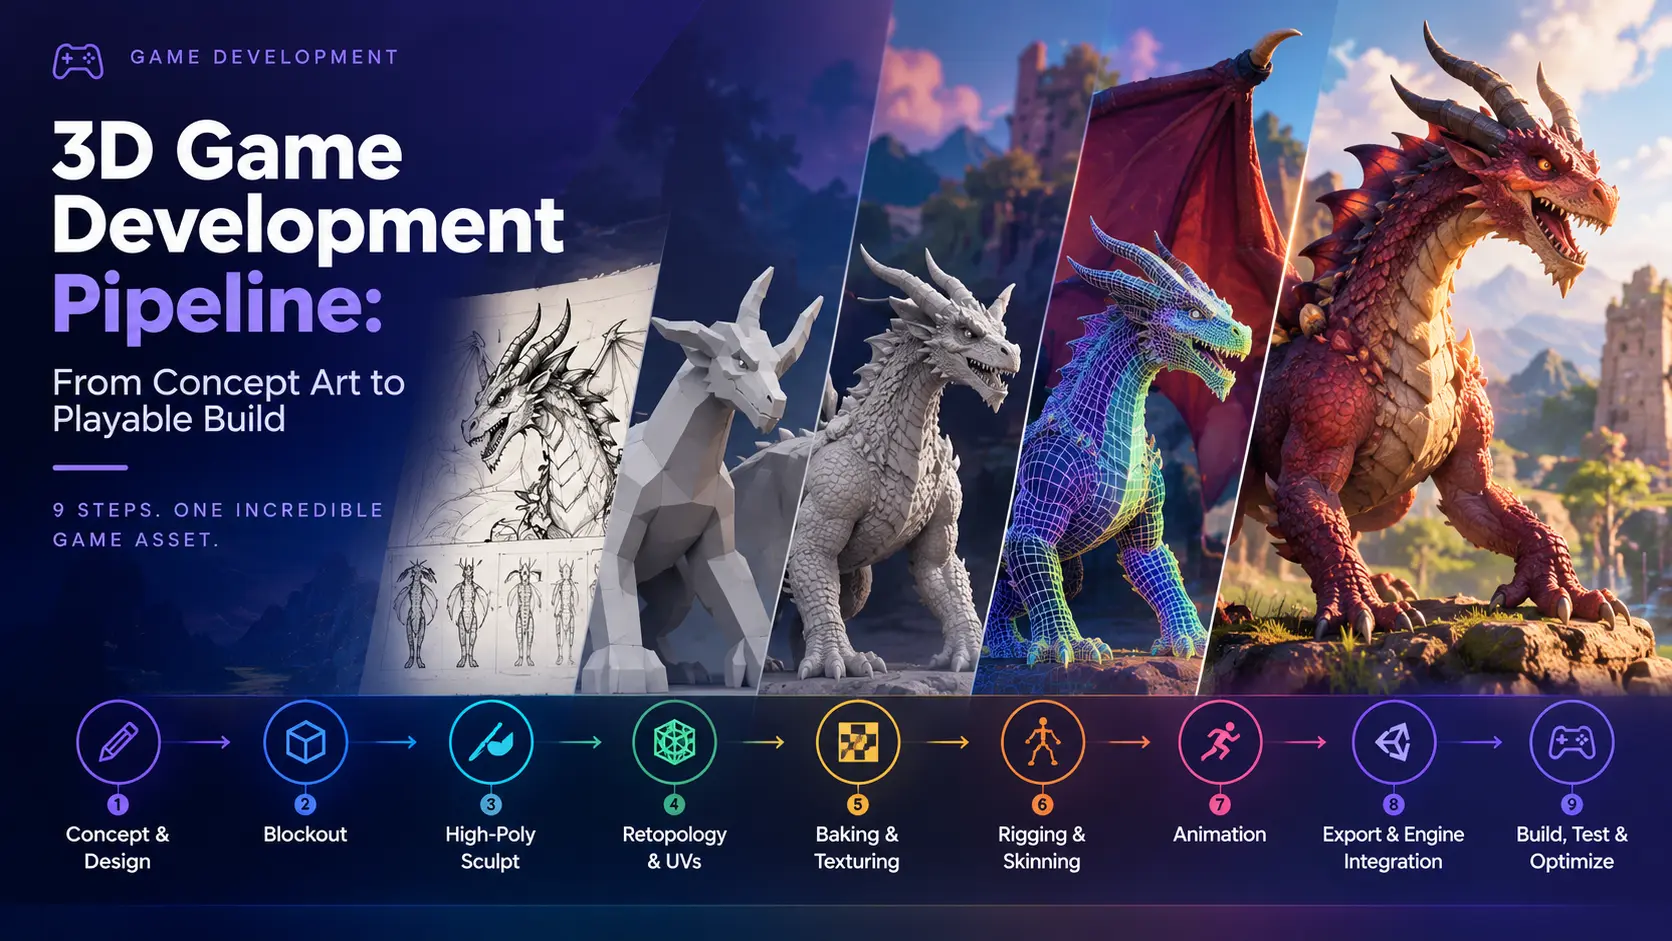
A sketch of a dragon takes an artist an afternoon. A dragon that flies across a level at 60 frames per second, casts shadows, reacts to a sword hit, and loads in under a second takes a team weeks. Everything that happens between those two points is the pipeline. Studios rarely fail because a single stage was done badly. They fail at the handoffs, where one department’s finished work turns out to be unusable for the next.
This guide follows one asset through nine gates, from concept to playable build. At each gate, it names who owns the work, what must be true before the asset moves on, and the classic mistake that sends it back. The sequence is the same for a character, a prop, or an environment piece, though the details change with the engine and the platform.
How a 3D Game Production Pipeline Works
A 3D game development pipeline is a chain of departments, tools, and agreements that turns an idea into a runnable game. Its job is to move work forward without moving problems forward. A good one catches a bad normal map at the texture stage instead of in the engine, and catches a rig that cannot deform at the rigging stage instead of during animation.
3D game production differs from film and animation production in one important way: everything has to run in real time. A film asset can take hours to render a single frame. A game asset has a few milliseconds, on hardware the studio does not control, alongside thousands of other assets. That constraint shapes every gate below, and it is why game pipelines obsess over budgets for triangles, textures, bones, and memory.
The Nine Gates at a Glance
| Gate | Stage | Typical Owner | Output |
| 1 | Concept and design | Concept artist, art director | Approved design and orthographic reference sheet |
| 2 | Blockout | 3D artist | Scale-correct rough model |
| 3 | High-poly sculpt | 3D artist | Detailed source mesh with no polygon limit |
| 4 | Retopology and UVs | 3D artist | Clean, game-ready low-poly mesh with unwrapped UVs |
| 5 | Baking and texturing | Texture artist | PBR texture set |
| 6 | Rigging and skinning | Rigger, technical animator | Deforming skeleton with weights |
| 7 | Animation | Animator | Game-ready animation clips |
| 8 | Export and engine integration | Technical artist, engineer | Asset configured and working in the engine |
| 9 | Build, test, and optimize | QA, engineers | Playable, performant build |
Static props skip gates 6 and 7. Characters and creatures pass through all nine.
What Can Actually Be Outsourced?
Game art outsourcing covers a wide range of disciplines: 2D and 3D character design, environment art, UI and UX design, concept art, marketing and key art, animation, and technical art like rigging and shader work. A studio can outsource a single asset category or run an entire art pipeline through an external partner, depending on internal capacity and budget.
Gate One: Concept and Design
Concept art answers what the asset is and what it needs to do in the game. The most useful concept package is not a single dramatic painting. It is an approved design plus an orthographic sheet showing the front, side, back, and top views at matching proportions, because a modeler cannot build from a three-quarter painting without guessing at the unseen sides.
What must be true to move on: the design is approved by the art director, the silhouette reads clearly at gameplay distance, and the gameplay requirements are written down. If a character needs to climb, crouch, or carry a weapon, the design needs to allow it. A cape that clips through every armor set, or a tail that cannot fit through a door, is a gate one problem that costs ten times more to fix at gate seven.
Classic mistake: designing for a beautiful illustration instead of a moving, in-game object. Early collaboration between concept and character design specialists and the animators who will move the result avoids most of this.
Gate Two: Blockout
A blockout is a rough model built from simple shapes at real-world scale. It exists to answer questions cheaply. Does the character fit the door? Does the prop read at the camera distance the game uses? Is the proportion right for the animation set?
Blockouts are fast, usually hours to a couple of days, and they let the team test in the engine before any serious sculpting. For environments, the equivalent is a gray-box level, and this is where level designers and artists agree on layout and scale. Our work on 3D environment design always starts with this stage for exactly that reason.
What must be true to move on: the scale matches the engine’s units and the game’s reference character, and the blockout has been seen in-engine in context.
Classic mistake: skipping straight to detailed sculpting and discovering later that the model is the wrong size.
Gate Three: High-Poly Sculpt
The high-poly sculpt is where the detail lives: pores, scales, stitching, dents, and worn edges. The polygon count is unconstrained at this stage, since this mesh will never ship. It exists to be a source, and its detail will be baked down into textures for the real-time model.
Sculpting tools such as ZBrush and Blender let artists work at millions of polygons. The mesh does not need clean topology, only accurate form and detail.
What must be true to move on: the form matches the approved concept, the proportions are checked against the blockout, and the detail is final enough that rework will not force a re-bake.
Classic mistake: sculpting detail that will be invisible at game distances. Detail should serve the camera, not the artist’s pride.
Gate Four: Retopology and UVs
Retopology rebuilds the sculpt as a clean, low-polygon mesh that a game engine can draw quickly and an animator can deform. This is where the game modeling pipeline earns its keep, because the quality of the topology decides how well the asset animates, how cheaply it renders, and how clean its textures look.
Three principles guide good retopology:
- Follow the form and the deformation. Edge loops should circle the joints and expression areas, such as shoulders, elbows, knees, and the eyes and mouth on a face, so the mesh bends without collapsing.
- Spend polygons where the camera looks. Silhouettes and areas of close inspection get density. Flat, hidden areas get less.
- Respect the budget. Triangle counts per asset class come from the platform and the art direction, and they should be written down before this gate begins.
UV mapping then flattens the mesh into 2D space so textures can be applied. Seams belong in hidden places, such as under arms, inside legs, and along natural edges. Consistent texel density across an asset, and across a set of assets, keeps textures looking uniformly sharp.
What must be true to move on: the mesh meets its triangle budget, is clean and watertight where needed, has no overlapping UVs unless intended, and has consistent scale and naming.
Classic mistake: retopologizing without talking to the rigger. A character whose elbows lack loops will crumple the moment it bends. The 3D character modeling and rigging teams should review topology together.
Gate Five: Baking and Texturing
Baking transfers the detail from the high-poly mesh onto the low-poly one as textures, most importantly a normal map that fakes the surface detail through lighting. Texturing then adds color and material properties.
Modern game art uses physically based rendering, where textures describe real material properties: base color, normal, roughness (or smoothness), metallic, and ambient occlusion. Substance Painter, Substance Designer, and Blender are common tools.
Baking has its own failure modes, and most come from mismatched inputs:
- Scale mismatches between the high and low meshes cause holes and projection errors in the bake. A small scale error is enough to ruin a normal map.
- Naming conventions for matching high and low parts, commonly `_high` and `_low`, ensure the right surfaces project onto each other.
- Cages control the projection distance and prevent rays from hitting the wrong surfaces.
- Normal map conventions differ between engines. Unreal expects DirectX-style normal maps with the green channel pointing down, while Unity uses OpenGL-style with green pointing up. A wrong convention makes bumps look like dents and lighting look inside out.
What must be true to move on: the bake is clean with no artifacts, textures match the budget for resolution and count, and channel packing follows the engine’s expectations.
Classic mistake: painting textures in a color space or channel layout the engine does not expect. An example worth memorizing: Unity’s HDRP mask map stores smoothness in the alpha channel, while workflows built around roughness need that channel inverted on export, or every asset comes out glossy.
Gate Six: Rigging and Skinning
Rigging builds the skeleton and the controls an animator uses. Skinning binds the mesh to the skeleton by painting weights that say how much each bone influences each vertex.
Game rigs carry limits that film rigs do not. Real-time engines usually cap the number of bone influences per vertex, with four a common ceiling, and mobile budgets often stay at that limit. Bone counts, joint hierarchy, and naming all need to follow the engine’s expectations, especially if the game uses retargeting to share animation between characters.
What must be true to move on: the rig deforms cleanly through its full range of motion, weights are painted with no unweighted vertices, bone influences stay within the engine’s limit, and the skeleton hierarchy is locked.
Classic mistake: changing the skeleton after animation begins. One renamed or reoriented bone can invalidate every clip made against it, so the rig is a contract and changes are announced.
Gate Seven: Animation
The game animation pipeline turns a rigged model into movement. The work covers idle, locomotion, combat, traversal, and reaction clips, delivered in forms that the engine can blend and trigger. A few real-time rules shape it:
- Responsiveness competes with weight. A long, satisfying windup feels great in a cutscene and sluggish in play.
- Loops must loop. Idle and locomotion cycles need clean seams, because players see them for hours.
- Clips must blend. Animators build for transitions, since the player’s next input is unpredictable.
- Root motion and in-place decisions are made early, because they decide which of the two, the animation or the gameplay code, drives movement.
- Foot contact must hold. Sliding feet are the most visible defect in locomotion, and one published field test uses under a millimeter of drift per planted foot as its pass mark.
Animators can work by hand or from motion capture, and many productions mix both. Our 3D animation and game animation teams plan which clips suit capture and which need hand keyframing before production begins.
What must be true to move on: clips meet timing and style targets, loop and blend cleanly, and play correctly in the engine as well as in the animation tool.
Classic mistake: polishing animation against gameplay that is still changing. Lock the core feel first.
Gate Eight: Export and Engine Integration
This is the gate where more schedules slip than anywhere else, because it joins two worlds that use different conventions. Engine integration is the process of bringing the model, textures, rig, and animations into the engine, configuring them, and making them behave.
The usual transfer format for models and animation is FBX, with glTF and USD gaining ground in some pipelines. The details that cause trouble are mundane and repeatable:
| Issue | What Goes Wrong | Prevention |
| Axis and unit mismatch | Models arrive rotated or at 100 times or one-hundredth scale | Agree on units and axes, apply transforms before export, and test with a reference object |
| Handedness and up-axis | Blender and Unreal treat Z as up, Unity uses Y, and handedness differs between tools | Use export presets and verify orientation on a test asset |
| Normal map convention | Surfaces look inverted | Standardize on the engine’s convention and flip on export if needed |
| Material and channel packing | Roughness and smoothness swapped, occlusion in the wrong channel | Document the channel layout, and use engine-specific export presets |
| Missing LODs | Performance collapses with many props on screen | Require LOD meshes in the export checklist |
| Collision | Props are not solid, or collision is too expensive | Author simple collision meshes with naming conventions the engine recognizes |
| Skeleton changes | Animations break on re-import | Version the rig and lock the hierarchy |
Both major engines handle import differently, and each rewards automation. In Unity, import presets and editor scripts apply settings by folder, and in Unreal, import factories and Python scripting can do the same. The goal is the same in both: a new asset enters the project in a correct state without anyone hand-ticking boxes. Studios building in Unity can see how this plays out in our guide to the Unity asset pipeline, and teams working in Unreal can read about performance implications in our guide to Unreal Engine game development.
What must be true to move on: the asset imports with correct scale, orientation, materials, LODs, collision, and animation setup, and has been placed and played in a real scene.
Classic mistake: treating import as a mechanical last step. This gate is where art, engineering, and performance budgets finally meet, and it deserves an owner.
Gate Nine: Build, Test, and Optimize
Assets are not done when they import. They are done when they run well in a build on target hardware, alongside everything else. This gate covers profiling, memory and load time review, visual checks across lighting conditions, and compatibility testing on a spread of devices.
Common findings at this stage include textures larger than their screen coverage justifies, props missing LODs, materials that are costlier than expected, and animation sets that blow the memory budget. Each is cheap to fix if caught per asset and expensive if found in aggregate near launch. This is why professional pipelines run performance checks on every milestone instead of waiting for the end, and why game testing belongs in the schedule from the first playable.
What must be true to ship: the asset meets its budgets in a shipping-configuration build on the lowest supported hardware, and the team has signed off on its look in game lighting.
Where Schedules Die?
Across nearly every production, the same few failure modes in the 3D game development pipeline account for most of the lost time.
| Failure Mode | How It Shows Up | Fix |
| Unclear handoff standards | Assets bounce back between departments | Write checklists for each gate, and agree on them |
| Late engine testing | Problems appear when change is expensive | Put assets in the engine at gate two |
| No budgets | Performance is discovered at the end | Set triangle, texture, bone, and memory budgets in pre-production |
| Unlocked rigs | Animation rework | Lock skeletons and version changes |
| No ownership of integration | Nobody notices the glossy characters | Assign a technical artist |
| Content before prototype | Months of art on a design that does not play well | Validate with a prototype first |
That last point matters most. A playable prototype should exist before art production scales. Our game prototyping work exists to answer the “is this fun” question while changing the design is still cheap.
Cobweb Games’ Approach to the 3D Game Development Pipeline
Pipeline design starts in the first week of a project. Cobweb Games writes the budgets, naming conventions, handoff checklists, and import standards before production art begins, then tests a vertical slice, one asset passed through all nine gates, before scaling. Studios working with us on 3D game development get a pipeline that is documented, tested end to end, and tied to the engine and target devices from the start.
For studios outsourcing part of the chain, our 3D game modeling and animation teams deliver to the client’s specification, so assets arrive ready to import instead of ready to rework.
Common 3D Pipeline Mistakes
Skipping the vertical slice. One asset taken through every gate reveals integration problems before they multiply across hundreds of assets.
Writing budgets late. Without numbers, every asset is a negotiation.
Retopologizing without the rigger. Topology decides deformation, and deformation cannot be fixed in animation.
Ignoring engine conventions. Normal map direction, channel packing, units, and axes are the same bugs on every project.
Changing the rig mid-production. Skeleton changes cascade into every animation.
Leaving integration unowned. The gate where most problems appear needs a named owner.
Testing only on the development machine. The lowest supported device sets the real performance floor.
Frequently Asked Questions
What are the stages of the 3D game development pipeline?
Concept and design, blockout, high-poly sculpting, retopology and UV mapping, baking and texturing, rigging and skinning, animation, export and engine integration, and build, testing, and optimization. Static assets skip rigging and animation.
How long does it take to make one 3D game asset?
It ranges from a day or two for a simple prop to several weeks for a hero character with a full animation set. Complexity, quality targets, and revision cycles drive the difference far more than the tools used.
What is the difference between high-poly and low-poly models?
A high-poly model carries fine detail with no polygon limit and exists only as a source. A low-poly model is the real-time version with a controlled triangle count, and the high-poly detail is baked onto it as textures such as a normal map.
Why do my textures look wrong after importing into the engine?
The most common causes are normal map convention differences between engines, wrong channel packing for roughness or smoothness, and incorrect color space settings. Check these three first.
Which file format should I export 3D models in?
FBX is the most widely used format for models, rigs, and animation in game pipelines. glTF and USD are gaining ground, and the best choice depends on the engine and tools in use.
When should engine integration start?
At the blockout stage. Placing a rough asset in the engine early reveals scale, orientation, and convention problems when they are cheapest to fix.
Outsourcing Done Right Looks Like a Second Studio, Not a Vendor
The studios that get the most out of game art outsourcing stop treating it as a transaction and start treating it as an extension of their own team. That means a real brief, a real feedback loop, and a partner chosen for fit rather than the lowest quote on the page. Cobweb Games works as exactly that kind of extension, running as an integrated art department for studios that need production capacity without the overhead of building one internally.
